Wednesday, August 28, 2013

Update on canned green tomatoes

I promised you an update on the green tomatoes I canned for having fried green tomatoes during the winter. Well they turned out great and were delicious. I will definitely being doing this again every year.


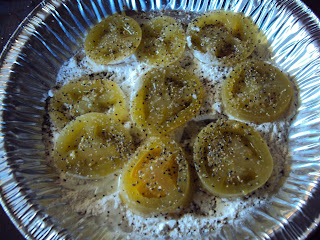
After opening the jar I drained off all the water. Place the slices gently in a pan of flour, sprinkled them with a little salt and black pepper then turned them over to thoroughly coat them with flour. 


I heated a tablespoon of olive oil and 1 tablespoon butter in a non stick pan. When the pan was hot enough I added the coated tomatoes and fried them on one side till golden brown then turned them and fried till the other side was golden brown. 


They turned out great and tasted just as good as fresh picked green tomatoes and the texture was no different that fresh cooked ones. :)

You do have to be careful in handling them because they will break apart if not handled gently but they are well worth the being gently with them. They are easy to can and for some one who loves fried green tomatoes like I do it will be great having them canned up to make fried green tomatoes when you can't get fresh ones. 


Sunday, August 25, 2013

Fried Green Tomatoes

 I really love fried green tomatoes. They are my favorite way to eat any tomato. I found out not to long ago from and internet friend of mine that she cans green tomatoes to use in making fried green tomatoes when green tomatoes are not in season. She was kind enough to tell me how to do it. :)

I also learned from another lady on the internet that she dehydrates green tomatoes for sending to her son so he can make fried green tomatoes during the off season. So I decided to try that first. They dried beautifully but when it came time to re hydrate them they did not do well at all. So I tried the canning way next.

I picked a bunch of green tomatoes, washed them good and then sliced them.  I had my jars already to go. Since I am the only one here I used half pint jars where my friend uses wide mouth pints.


I filled the jars to one inch line. Covered them with boiling water to the 1/2 inch mark, added a half a tablespoon lemon juice, wiped the rims of the jars and then added the 2 piece caps. I processed them for 40 minutes in a boiling water bath. They came out looking really good. 


I have a total of 15 half pints to last me till next year. The problem is I am not sure they will last that long with as much as I love to eat them. I have not tried frying the canned ones yet but will do so later this week and then I will report back with the results. But I am sure they will come out pretty good. 

I also had enough red tomatoes to can 7 pints of tomato sauce yesterday. I will be using it to make tomato gravy for hubby once in awhile. 


I hope those of you who can your own foods are having a good canning season. :)

Saturday, August 17, 2013

Home Made Tv Dinners

Do you like the convience of tv dinners but don't like the idea of their cost and what all is in them? I don't either. I want to know what is in the food I serve my family and keep costs down at the same time. By doubling up on what you are cooking one night you can make enough to have a meal for everyone another night during the next month or two. Or have lunches for those who have access to a microwave at work.

Tonight I made pork enchiladas, refried beans and rice. I made enough to serve 3 meals tonight and have 9 more to make tv dinners for lunches or dinner during the next two months. This will save me time later on and because I made everything home made it cost me less than buying 9 tv dinners at the store.


These trays are trays that my uncle got when he was getting meals on wheels for seniors. He would save the trays for me. Some of them are also trays that you get food in from a fast food place. I also have family members who buy tv dinners save their trays for me. The trays cost me nothing and I can use them over and over again.


As you can see some of the trays have two compartments and some have three. When there is two I will combine a couple of the meal components in to one compartment.


Most of my trays have lids. I put the lids on them, set them in the freezer to freeze. Once they are frozen hard I take them out and quickly take off the lids, cover with plastic wrap, put the lid back on and back in to the freezer they go. I do that just to give the food a little extra protection from freezer burn.  For the ones I have no lids for I cover them with plastic wrap and foil.


They stack nicely in the freezer and are ready to grab and pack in a cooler to take to work or to get one out and heat up when some one is hungry.

What you can not see is that I use a Dymo label maker to make labels of what each dinner is and place them on top of the lids. That way you don't need to open to see what the meal is.

I have made lots of different meals this way and my family loves having them on hand for days when I am busy or sick they have  complete home cooked meal with out me having to cook it.

Some of the meals I have made are as follows:

Meatloaf, mashed potatoes and corn
Roast beef, gravy, mashed potatoes and peas & carrots
Pancakes, scrambled eggs and sausage patties
Beef & Bean Burritos and Spanish rice
Chicken Stew & biscuits
Spaghetti and Meat Sauce ( only cook the spaghetti noodles half way done before freezing )
Mac & Cheese w/ little sausages
Ham Steak, Baked Sweet potato and mixed vegetables
Sliced Turkey breast, stuffing and green beans

I used frozen vegetable straight from the bags with out cooking them. They will cook while you are heating up the dinner. I use only round white potatoes to make the mashed potatoes because baking potatoes some times turn grainy when frozen. I prebake the sweet potatoes and let them cool completely before cutting in half and placing in the trays.

Once you get in the habit of making these home made tv dinners you will love them. They are really easy to make a cheaper than store bought. And you can make them the way you want them. :)


Thursday, July 25, 2013

Son's birthday cake

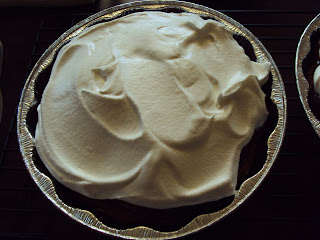
We like cakes but we get tired of frosting. Beside since two of us are diabetics we really don't need the super sweet frosting that most cakes have. So a couple of years ago I stopped using frosting except for very special occasions. Instead I use pie filling and cool whip to top cakes. This year my son asked if I could make him a cake with chocolate pie filling and cool whip on top. Since I like a  challenge I decided to give it a try and see what I could come up with. Here is the finished product.


I started with one white cake mix and made it according to the directions on the box except instead of using oil that was called for I use unsweetened applesauce. I divided the batter between 3 - 8 inch pans to further cut down on the amount of calories. I bake them for 30 minutes at 350 degrees. Once cooled I put a lid on one of the cakes and stuck it in the freezer for future use. I split all cake batters into 3 pans and usually freeze two and serve one. But this time I needed two. After the cakes were completely cooled I made up a box of instant chocolate pudding and divided it between the two cakes.


I then topped the cakes with cool whip and place the lids on them and popped them in the freezer to get good and cold. We had half of one of them for dessert that night and the next day the other one went with my son to a friends house the next night so they could pig out while playing video games.


He let me know that he would like to have this cake more often. Normally I make these cakes using cherry or blueberry pie fillings instead of pudding.

My son's birthday was last week and tonight I decided to pull out the third cake and top it with cherry pie filling and cool whip. The only problem was that I had forgot I used the last of the cool whip I had in the freezer when I made a cake to take to a dinner after then death of the father and husband of some friends of my son's and I. So I had to come up with another way to top the cake today. No big deal. I pulled out the vanilla ice cream and put a scoop on each slice. The men folk loved it. I will wait and find out tomorrow how good it is because I didn't want any cake tonight. :)


Here is the piece my son had tonight. Looks good doesn't it?

Green beans, Waxed Beans and Mustard Greens w/bacon

I have been so busy with the garden and life in general lately that I have not had any time to devote to this site. I am hoping to get back to doing it at least every other day. I haven't really canned much in the last month and a half until these past few days.

I have been picking green beans, waxed beans and mustard greens the past couple of weeks and getting them canned up. Here is a picture of some of what I have canned in the last few days.


A close up of the mustard greens shows you the bacon in with them. :)


 I like to can whole waxed beans to use in stir frys and to lightly fry in a tiny bit of olive oil, onion and garlic. YUM!


I am still getting some green beans and waxed beans but they are almost done. I am going to try a new recipe of pickling them with cauliflower, carrots and red bell peppers. I will let you know how that turns out.

To can the mustard greens I washed them several times then gave them a rough chop. Wilted them in boiling water along with the bacon. I then filled the jars, wiped the lids and processed them for 90 minutes at 10 lbs pressure.

For the green beans and waxed beans I raw packed them. I removed the ends and then snapped the green beans into 3 pieces. Same with some of the waxed beans. I filled the hot jars with the beans and then added 1 teaspoon of canning salt to each jar and filled to the one inch head space with boiling water. Wiped the rims then added the hot lids and rings. Placed them in the pressure canner and processed for 25 minutes at 10 lbs pressure. The pints were processed for 20 minutes at 10 lbs pressure. We will have plenty of green beans and waxed to eat this winter. :)

I need to plant a second crop of mustard because this was the first time I did it and didn't realize just how much it takes to fill a quart jar. :) I still have enough time to get one more crop of the mustard grown in time before winter gets here.

Tuesday, May 21, 2013

Prayers for the people of Moore OK


Our hearts and prayers go out to the people of Moore, OK. 
As you morn and cry over your losses we will  morn and cry with you.
May God bring you strength to endure the days, weeks and months ahead
and may you know that the American people are behind you with offers 
of help, prayers and best wishes for better times ahead.


Monday, May 13, 2013

Rain Gutter Garden

Part of being prepared for anything that life has to throw at you is learning how to do things that will help you survive no matter what problems come along. Be it a sudden lay off, the main bread winner gets sick, rising food prices or what have you. Learning to live a self sustainable life no matter where you live can go a long way to help you get through any rough times.

Gardening and growing your own food is one way to become self sustaining. Some people would be surprised at how much food they could grow every year if only they thought out of the box. When you mention gardening to them they automatically think of a big plot of land of maybe a acre or two. Next they start thinking about all the work involved in growing a garden the way our grandmothers and great grandmothers did. Once they do that they say the heck with it because there is to much work involved.

I have had a 30 ft x 20 ft garden for quite some time and last year I decided to expand on the amount of food I could produce each year. I started by buying two drawf fruit trees. One plum and one cherry.


Cherry Tree


Plum Tree


Even though both of them bloomed this year I will not be able to harvest from them. The branches are to thin to handle the weight of the fruits this year so if any fruit does start to grow I will pick it off and discard it. Hopefully the branches will be able to support the weight of fruit next year.

Since I can not enlarge my actual garden I must find other ways to grow more food. For me going vertical  is about the only way I can enlarge my growing area. This past weekend I was able to add another 40 feet by 6 inch growing space in the form of rain gutter gardening. I bought 4-10 foot sections of vinyl rain gutter, 12 bracing brackets and 8 end caps. I also bought 4-8 foot long boards to hang the gutters on. I didn't have to use the boards but I did it so I would not have to put so many holes in the siding of my garage. 


I drill holes 6 inches apart all along the bottom of the gutters.


Then my son and his friend attached each of the boards to the side of the garage with 3 long 4 inch screws.


Then they used one inch screws to attach the gutter and brackets to the wood.


I have not had a chance to fill them with soil and plant yet because it started raining on us when we were getting the last gutter up Saturday. Yesterday was real windy and then today we work up to a heavy frost and the temp was 28 degrees. By the time I took my son to work at 6 am we had climbed up to a balmy 30 degrees. LOL

Tomorrow I will be filling these with soil and planting them since last night was suppose to be our last frost. I will take some more pictures in an few weeks after the plants start growing good. 

I also ripped out every thing I had in a flower bed I have not used in a couple of years and I am starting it over as a herb bed. Flowers are nice to look at and some of them are edible but I would rather have herbs since I use them in cooking a lot. 

Next on my to do list will be to get two more fruit trees. I want a granny smith apple and a peach tree. Then  next year more vertical gardening will be added.